It was a small thought. Ages ago. “Wouldn’t it be fun to make glowing mushrooms!” The short answer, it turns out, is “no”. The obnoxious answer is “the journey is the goal”. So i guess the truth is somewhere on the scale between yes and no.


There’s a pandemic these days, so Time is a bit warped. I started researching a bit. A bit became a lot. Then it escalated to massive, and then rapidly sped up to “embarrassing”. And by research i mean looking at my own mushroom photos and at stuff online. I have done a good deal of crawling around on the forest floor with a lens all up in shroomy business.


I now want them in my bookshelf, and bioluminescent, or at least glowing. Seems bioluminescent shrooms mainly glow greenish. No worries. Art to the rescue. I can do whatever i want.


First try: Fimo polymer glow-in-the-dark clay. It … i guess it … works, it is just flat and boring. The glowing is too even, and it doesn’t shine and show off the lamellas. It looks like the Playmobil ghost i got as a kid. Meh. If i had a visitor, i would need to point very specifically and probably “no, a bit to the left, see the stone bookend? down to the left a bit”. Needing a scout leader to guide you through the bookshelf so you can see my glowing mushrooms, is not exactly the effect i am after. I want a mysterious, soft glow that spreads small pools of light.
LED lights, then.
I hate fiddling with electronics. I had a job where I soldered every day for six years. It’s not the soldering i object to. It’s the electronic-part. Current, volts, ohms. Transistors, resistors, fuses. Fires. Don’t understand much of it. So with gritted teeth and already annoyed before i started; … i started.
Buying LEDs, resistors, cables, and power supply. I find it annoying just thinking about these things. I have almost 24-hour access to dozens of electronics nerds at my makerspace, who would love nothing better than to drown me in advice, questions, and FAR more facts than i will ever want. I can’t bear to ask them, knowing a good few of them will take the opportunity to show how knowledgeable they are, with little regard for what it is i actually want. Show-off-ing masquerading as “advice”. The mark of The Obnoxious Nerd. Ideally, the perfect interaction would be me explain exactly what i want to achieve, and have someone give me a shopping list. No more. I have a complicated relationship with these people, i like them. At a distance.
Advice: just close your eyes buy a random assortment of resistors and LEDs. You can figure it out when you get home and don’t have a pimply 15 year old electronics-geek “helping”. Or equally annoying: a pimply 15 year old village idiot that knows less than you do. And get electrical tape.
Powering LEDs for dummies

You can’t do a lot of wrongs. As long as your power supply is a few AA batteries, the worst that can happen is that you burn out some LEDs. No, they don’t catch fire, they just stop working. Maybe you’ll get a little flash if you’re lucky. I had 4xAA battery box with switch. Recommend that. The switch. Connecting a LED directly to the pack would give it too much juice, and it’ll keel over and die. This is the technical terms i am using here. Juice. Keel over. So you need to restrict juice. Therefore, resistors. They are coded, they have numbers, there are calculators that will be more confusing than a chess tournament. I did caaareful calculation, and within 13 minutes threw them out. If you want the LED to light up at full capacity: get the calculations exactly right. If you want to make soft bioluminescent shrooms, you want a LOT MORE resistance. Throw All The Ohm at the Thing.
Soldering, connecting..


First out, i soldered the resistor to the positive leg of the LED. Seemed a pretty good precaution at the time. Then i discovered i should forget those calculations of resistance. Here is the problem: each shroom hat/cap would be different and i wanted to be able to individually match the strength of light to each hat. Also according to where i would position them. So that if one is below another, then perhaps i want the light to be a bit stronger or weaker. Also, different coloured LEDs have different strength. Duh. Light.
Serial or parallel?
You know those xmas strings? They are serially connected. It means they are loops, with LEDs connected to each other in a chain. Serial circuit. Apparently, this is energy efficient. The main drawback is that when one LED dies, the entire chain stops working. I find this whole electronic thing so annoying in itself, that would just drive me mental. I make, bake, roll clay, solder bits, wire up, drill holes, connects stuff, and when the entire ensemble is glued, fixed, screwed, and cast in place, POOF! one LED blows, and the entire thing dies. Can’t risk that, i’m too much of miss Butterfingers. Miss Fury Butterfingers. So parallel it is. Each LED is connected to the power individually. If one dies, the others’ are Happy Larrys, and i can fine-tune the glow.
Stems

Polymer clay needs baking in the oven for half an hour. Not an environment electrical cables would thrive in. So i figured i either had to make hollow clay tubes, or come up with something else. The hollow polymer tubes was meh. Thick, inelegant. No sway. Then i tried air-drying paper clay, that would let me just roll the cables into the clay. That kinda works, but two problems: 1. you really need to have decided which shape the stem should have beforehand. 2. it didn’t matter much how much sanding and rolling i did, they’re just not elegant enough, they always ended up too thick. Too lumpy. This had me stuck for a bit. With stems this thick, for the proportions to work, the shrooms would have to be 15-20 cm tall and that is just ridiculous.
I pondered. What i really wanted was: a tube that was very narrow to make elegant stalks. Uniform and not lumpy. Flexible so that i could shape it in situ, and change my mind. And not too shiny.
!stroke of genius!
The answer is: white heat shrink tubing. You could shrink it directly on the cables, but this would make it a bit bumpy. ‘Member i said i soldered every day for six years? Did use a lot of heat shrink tubing. It shrinks, and as it does so, it hardens a bit. Compresses, i guess. I found white tubing on the internet, bought it, it arrived two days later. Using a very thin knitting needle, i pre-shrunk the tubes, and voilá! PERFECTLY smooth, narrow as can be, wavy, stalky stems. Infinitely bendable. And i can shrink to different thicknesses and conical shapes! I am a genius!


The reason for the steel wire in there, is for bendability and stand-up-ility. Also, it turns out that for the LED to spread the light inside the mushroom hat, there needs to be a bit of a distance between the LED itself and the top of the hat. So you can’t just shove it in there, you’d end up with a disappointing, small glowing blob, rather than a radiating, mysterious inner glow. Trust me on the inner glow.
Hats!
Caps i guess is the term. I made a LOT of mistakes, blunders, doing over, throwing out, but to make a long, rather expensive story, short. I ended up using Fimo translucent polymer clay, and adding a tiny bit of brown or blue. I think perhaps i should rather add white and purple. Might try that.


There is a question where do you want the colour coming from? Should the LED provide the colour, or should the translucent clay be mixed with coloured clay? So far i’ve gone with letting the LEDs for the most part do the colours, but i think i might want to experiment a bit more with coloured hats. Purple would be good.
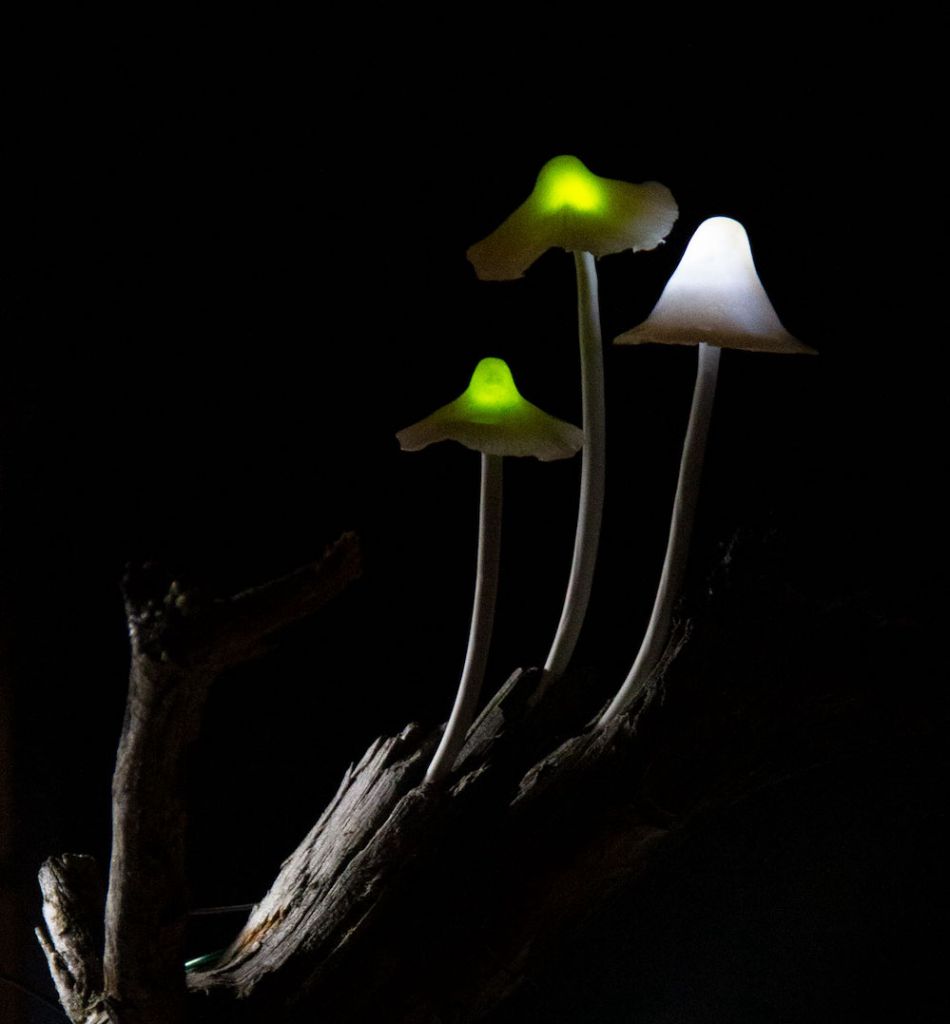
Lights on! Proof of concepts. Endless proof of concepts…


The stick
Go into the woods and find a nice stick. I’d suggest conifers, cedar, pine – something like that. With a heat gun or a fire, you could do some magical burned wood. I found this one and it has a lovely sweeping arch.


..or go to the pet shop and get one of those roots they put in aquariums. Some of them are visually just messy with no will of its own. Find something with simplicity and direction.
There you go. Done.


Put all the things together.
And spend a day and a night photographing the thing.
Then put it on the shelf.
And forget all about it.
CM. says:
How do you make your gill covers for the mushrooms? Are they 2 parts? Gill cover and the cap? CM.
benteh says:
yeah; they are two parts. the “hat” and the gills – and i gently texture them separately and join them.